How to setup Sequelize migration in a NestJS Project

When building your backend application with Sequelize, you need a way to ensure your database is in sync with changes made in your model schemas. Sequelize provides three ways to do this:
sequelize.sync({force: true}) — When your application starts up, this deletes all tables including the data in them, and recreate them from scratch. If you have any changes in the model schema definitions, it will update them as well. This is suitable for development and not for production. If you are doing rapid development and you don’t care about existing data in your database, this is fine.
sequelize.sync() — This only creates new tables that don’t exist and if an existing table has changed it won’t update it. This is not recommended for production but it is suitable for development.
Migrations — With Migrations, you can alter your existing tables and add new ones without losing your data. This is the best option for production. I recommend using it for development so you can get used to it.
In this post, I will explain how to create Sequelize migration in a NestJs project.
Set up
Install Nest globally on your machine if you have not.
npm i -g @nestjs/cliLet’s create a new Nest project. On your terminal or cmd, cd into the directory where you want to create your application and run the following commands:
nest new nest-sequelize-migrationcd nest-sequelize-migrationnpm run start:dev
Sequelize setup
We’ll start by installing the following dependencies. Make sure your terminal or cmd is currently on your project root directory. Then run the following commands:
npm install --save @nestjs/sequelize sequelize sequelize-cli sequelize-typescript pg-hstore pgnpm install --save-dev @types/sequelize
Here, we imported the SequelizeModule and configured our database.
Create a User Module.
Run this command to create a User Module:
nest generate module userNow, create a simple user model. create a user.model.ts file inside the user folder and add the following code below.
Here, we add the user model in the User module.
We need to let Sequelize know about the user model by inserting it into the models array in the module forRoot() method options:
NOTE: if you have an error because of the Sequelize models array, change your sequelize in your package.json file to "sequelize": "^5.22.3", and sequelize typescript to “sequelize-typescript”: “1.1.0”, then run npm install.
Now create a .sequelizerc file in the root folder. Add the following code.
const path = require('path');module.exports = {
   'seeders-path': path.resolve('src/database', 'seeders'),
   'migrations-path': path.resolve('src/database', 'migrations'),
   'config': path.resolve('src/database', 'config.ts'),
}
Let’s generate our user migration file with sequelize cli. run the following script on your terminal
npx sequelize-cli migration:generate --name create-userIt will create a database/migrations folders and generate a .js file inside it with content similar to this
'use strict';module.exports = {
   up: async (queryInterface, Sequelize) => {      /**
       * Add altering commands here.
       *
       * Example:
       * await queryInterface.createTable('users', { id: Sequelize.INTEGER });
      */
   },   down: async (queryInterface, Sequelize) => {
      /**
       * Add reverting commands here.
       *
       * Example:
       * await queryInterface.dropTable('users');
      */   }
};
Now let’s update the migration file.
Inside the database root folder, create a config.ts file, and write the following code. Sequelize needs this config to run the migration.
module.exports = {
   development: {
      dialect: 'postgres',
      host: 'localhost',
      port: 5432,
      username: 'roku',
      password: 'roku',
      database: 'test',
   },
   test: {
      dialect: 'postgres',
      host: 'localhost',
      port: 5432,
      username: 'roku',
      password: 'roku',
      database: 'test',
   },
   production: {
      dialect: 'postgres',
      host: 'localhost',
      port: 5432,
      username: 'roku',
      password: 'roku',
      database: 'prod',
   },
}
Finally, run the migration script
npx sequelize-cli db:migrate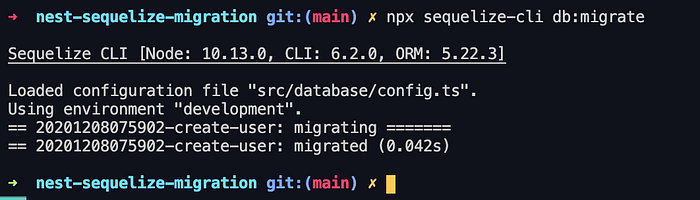
Conclusion
We have seen what migration is and how we can set up Sequelize migration in Nestjs.
I hope this article was helpful. You can connect with me on LinkedIn and Twitter.
